漏洞:https://www.crowdstrike.com/blog/pwn2own-tale-of-a-bug-found-and-lost-again/
固件:https://support-en.wd.com/app/products/product-detail/p/139#WD_downloads
下载:https://downloads.wdc.com/gpl/WDMyCloud_PR4100_GPL_v2.40.155_20200713.tar.gz
跟着txt文件走
即 WD_My_Cloud_PR4100_Release_Notes_GPL_v2.40.155_20200713.txt
3.5
开始报错,所以首先应该git init,然后sudo apt-get install lib32z1,再./xbuild.sh build,原因如下
- fatal: Not a git repository (or any of the parent directories): .git :
git init - fatal: Needed a single revision :
1 | ./xbuild.sh build |
报错但是没有提示信息没找着解决方案,后面就也是这种编译信息了,目前还没发现问题,先放着
- error while loading shared libraries: libz.so.1: cannot open shared object file: No such file or directory :
sudo apt-get install lib32z1
3.6
报错,cp: cannot create regular file '/home/ctfer/IOT/WDMyCloud_PR4100_GPL_v2.40.155_20200713/toolchain/../firmware/merge/WDMyCloud/bzImage': No such file or directory和类似的玩意,但是好消息是这些报错和上面的fatal: Needed a single revision应该都是无关紧要的:
The following build errors or warning messages are normal, and should be no cause for concern.
Copy Error (build script compensates, caused by broken xbuild script install method):
cp: cannot create regular file ‘/Build/WDMyCloud_PR4100_GPL_v10.30.165_20170321/toolchain/…/firmware/merge/WDMyCloud/bzImage’: No such file or directory
cp: cannot create regular file ‘/Build/WDMyCloud_PR4100_GPL_v10.30.165_20170321/toolchain/…/firmware/merge/WDMyCloud/’: Not a directoryGit Error (ignore, originates in xbuild script):
fatal: Needed a single revision
Kernel Module Signing (ignore or install certs):
No X.509 certificates found
Unresolved (ignore, probably a bug):
drivers/target/target_core_pr.c: In function ‘core_scsi3_pr_seq_non_holder:
drivers/target/target_core_pr.c:332:3: warning: ‘return’ with no value, in function returning non-void [-Wreturn-type]
return;
来自:https://community.wd.com/t/how-to-build-custom-firmware/217408
4.5
1 | ./xbuild.sh: 7: ./xbuild.sh: source: not found |
需要将shell解释器改为bash
- 执行
ls -l /bin/sh命令,若得到结果/bin/sh -> dash,则说明shell的解释器为dash。 - 执行
sudo dpkg-reconfigure dash命令,然后选择no。 - 再次执行
ls -l /bin/sh命令,若得到结果/bin/sh -> bash,则说明成功更改shell的解释器为bash。
https://help.aliyun.com/document_detail/109503.html
搭qemu环境
binwalk -Me WD-NAS-firmware可以直接获取到squashfs-root
看exp该漏洞主要和login_mgr.cgi相关,检查可得
1 | $ grep -r "wd_login" |
查找“login_mar.cgi“没得到啥有用的信息,直接运行需要libc文件,索性先qemu起起来再说
配置网卡
pdf的开始报错,来试试我上次成功的路线
1 | $ sudo apt-get install bridge-utils uml-utilities |
将/etc/network/interface改为
1 | # interfaces(5) file used by ifup(8) and ifdown(8) |
将/etc/qemu-ifup改为
1 | #!/bin/sh |
赋予文件/etc/qemu-ifup 可执行权限:
1 | sudo chmod a+x /etc/qemu-ifup |
重启网络使所有的配置生效:
1 | sudo /etc/init.d/networking restart |
报错:networking.serviceJob for networking.service failed because the control process exited with error code
1 | $ systemctl stop NetworkManager |
(看起来已经重启完成了)
1 | $ sudo ifdown ens33 |
还有一步$ sudo ifup br0,但是会报Unknown interface br0,但是ifconfig又有br0,非常的怪,和pdf报的错差不多,我先不去管它,来试试开个qemu
1 | sudo qemu-system-x86_64 -hda debian_squeeze_amd64_standard.qcow2 -net nic,macaddr=00:16:3e:00:00:01 -net tap |
eth0找不着,且并没有分配好ip,大失败
搭qemu环境2.0
我发现ens33和eth0好像是同一个玩意,那么根据我linux上的情况
1 | $ ifconfig |
我可以再次尝试pdf上的方法,将eth0改为ens33即可
1 | $ sudo brctl addbr br0 |
更改qemu-ifup文件:sudo vim /etc/qemu-ifup
1 | #!/bin/bash |
起qemu
1 | sudo qemu-system-x86_64 -hda debian_squeeze_amd64_standard.qcow2 -m 256 -net nic -net tap,ifname=tap1,script=/etc/qemu-ifup,downscript=no |
还是有问题,ifup eth0失败
搭qemu环境3.0
怀疑是我自己环境的问题,索性直接来试试在全新的ubuntu20上开
直接启动
1 | qemu-system-x86_64 -hda debian_squeeze_amd64_standard.qcow2 |
发现qemu可以ping通主机,还能传给主机文件,也能ping通百度,但是主机却ping不通虚拟机,主要是找不着ip。qemu上ifconfig只有默认的10.0.2.15
继续跟着pdf来设置
1 | $ sudo brctl addbr br0 |
但是直接就失败了,我虽然也生成了一个br0,但是ip和ens33的一样,据学长说是DHCP的问题
经教练提点,我打算放弃桥接的思路,直接进行一个qemu的端口映射,web服务,gdb调试端口啥的全都映射到主机,应该就不需要ping通了
成功:
1 | $ qemu-system-x86_64 -hda debian_squeeze_amd64_standard.qcow2 -net user,hostfwd=tcp:172.16.119.176:2222-:22 -net nic |
1 | $ ssh -p 2222 root@172.16.119.176 |
起服务
首先mount
1 | $ mount -o bind /dev ./dev |
但是这里报错 chroot failed to run command ‘/bin/bash’ no such file or directory
找了一下,原因是缺少/bin/bash或者没有相关的库文件

cp过来后发现还是不行,会报上图第一行的错,索性把qemu的/bin/bash cp过来试试

把所有相关的lib文件复制完成后chroot倒是成功了,但是连ls都没有…这文件系统也太水了
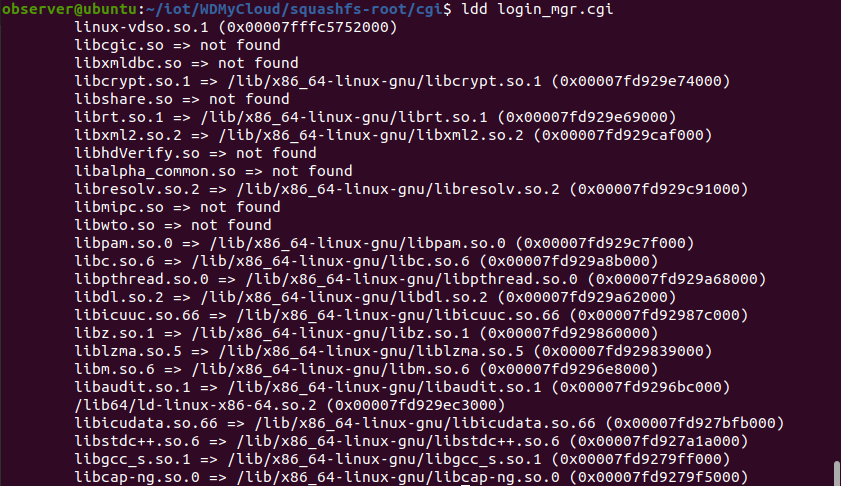
试图执行login_mgr.cgi 会报错libc.so.6: version GLIBC_2.14 not found发现似乎是glibc版本太低了,使用strings打印可以看到
1 | $ strings libc.so.6 | grep GLIBC_ |
最高只支持到2.11
但是有点尬住了,我试图运行的时候发现缺一堆lib库,然后发现系统支持的glibc版本太低了,打算先更新下glibc,但是运行不了,因为qemu里面嘛也没有

那就只能在ub20上运行,发现缺一堆玩意就算起起来也只能勉强使用这一个服务,算了,去试试教练已经弄好的群晖nas了

结果:
最终结果就是搞定了具体的编译和qemu的网络配置,但是并没有起上来服务,溜了溜了
